Nowadays, nearly every modern organization is moving their business to the cloud. Protecting your organization’s users and their accounts from being compromised is easy when you have an on-premises setup like Microsoft’s Azure Active Directory. But what if you’re using Office 365? Well, you’re still in luck. In this article, we’ll take a comprehensive look at how Office 365 multi-factor authentication helps protect your data.
Download our PowerPoint deck: 7 Free Things You Can Do to Improve Your Clients’ Office 365 Security
What is multi-factor authentication?
Multi-factor authentication is a simple way of protecting user profiles by requiring users to provide more than just their username and password when attempting to log in.
In Office 365, multi-factor authentication adds a second layer of protection that requires users to provide proof of their identity before they are granted access to a profile.
For example, if someone managed to crack or steal your password but doesn’t have the device you associated with your profile, they won’t be allowed to log in. So that second factor—the mobile or office phone—will protect your account from unauthorized logins.
Licensing
The best part is that multi-factor authentication is free with an Office 365 subscription. Though Office 365 multi-factor authentication is part of Azure, you don’t need any additional license to use it for your Office 365 tenant. You only need an Azure AD Premium license in case you want to use advanced features of Azure multi-factor authentication.
How multi-factor authentication works in Office 365
Microsoft offers three different ways you can use multi-factor authentication to prove your identity from your phone:
- Use the Microsoft Authenticator app. This app provides you with a one-time password (OTP) or a push notification. You can either use that device as a software token that provides OTP or you can use it as a push notification hub that will get notifications from the central multi-factor authentication service.
- Receive a phone call on your registered number. If you select this option, you’ll receive a call on either your mobile or landline phone and will be asked to press the pound sign (#) to confirm your identity.
- Receive a text message at your registered number. You’ll receive an OTP through a text message sent to your mobile. You then simply enter the OTP on the screen where you’re trying to log in.
You can either use one of these options or configure multiple options for multi-factor authentication.
Below are the options that an Office 365 global admin sees when enabling multi-factor authentication for Office 365 users in their organization:

When users complete their multi-factor authentication registration, they can also choose default and secondary options from the ones enabled by their global admin. Users will see the following screen:

How to set up multi-factor authentication in Office 365
It’s important to note that you need to be a global administrator to enable multi-factor authentication in Office 365. Once you’re signed in, simply follow these steps:
- Go to https://portal.office.com and visit the Admin Center (https://portal.office.com/adminportal/home)
- On the left navigation pane, expand Users and click Active Users.
- In the Active Users window, click the dropdown arrow next to More and select Setup Azure multi-factor auth.
- Select the user account(s) on which you want to enable multi-factor authentication. You can select all users by clicking on the checkbox next to Display Name at the top of the page.
![How to set up multi-factor authentication in Office 365 1]()
- You should be able to see the multi-factor authentication status for a user in the column titled Multi-Factor Auth Status.
- After selecting the required users, click on Enable.
![How to set up multi-factor authentication in Office 365 2]()
- You can also enforce multi-factor authentication on a user account in Office 365 even if they have not completed registration or chosen their second verification method
![How to set up multi-factor authentication in Office 365 3]()
- There are three different states of multi-factor authentication that can be applied to user accounts:


a. Disabled
This is the default state for a new user who has not been activated for multi-factor authentication by an Office 365 administrator.
b. Enabled
The user has been enabled for multi-factor authentication by the administrator but has not completed the registration process. They will be prompted to complete the process the next time they sign in.
c. Enforced
The users have completed registration and are using multi-factor authentication.
Signing in with multi-factor authentication
- Users will go to their Office 365 portal (https://portal.office.com) and enter their username, then click Next.
![Signing in with multi-factor authentication 1]()
- The user will enter their password and click Sign in.
![Signing in with multi-factor authentication 2]()
- On this page, the user will be prompted to register for multi-factor authentication and set up two-factor or additional verification in Office 365.
![Signing in with multi-factor authentication 3]()
- The user will be taken to the Additional security verification page, where they’ll choose their preferred contact method.
![Signing in with multi-factor authentication 4]()
![Signing in with multi-factor authentication 5]()
- After completing registration, the user will be taken to the app password section of the Additional security verification page. From here, they can copy the app password that would be required to sign in to non-browser-based apps (rich clients) like Skype for Business. (This page will appear only if an administrator has enabled the creation of app passwords.)
![Signing in with multi-factor authentication 6]()
- After clicking Done, the user will be successfully signed in to their Office 365 portal.


App passwords
App passwords are used by older client applications, specifically rich client applications, that don’t rely on browsers and thus cannot redirect you when performing multi-factor authentication. In those cases, users create an app password from their Office 365 portal and use that to sign in to those applications.
The app password is a 16-character password that is randomly generated by Office 365. You can view this password only once—when you initially create it.
Manually creating an app password from the Office 365 portal
- Sign in to your Office 365 portal. In the top right, click on the Settings icon and select Office 365 under Your app settings.
![Multi-factor authentication Manually creating an app password from the Office 365 portal 1]()
- On the Settings page, select Security & privacy.
![Multi-factor authentication Manually creating an app password from the Office 365 portal 2]()
- Under the Additional security verification option, click on Add or change your security verification settings.
![Multi-factor authentication Manually creating an app password from the Office 365 portal 3]()
- On the Security & privacy page, select Create and manage app passwords.
![Multi-factor authentication manually creating an app password from the Office 365 portal 4]()
- On the next window, select App Passwords. You can either create a new app password or delete an existing app password on this page. However, you can neither change an existing app password nor view the password once it has been created. You can only view the app password once, at the time of creating it.
![Multi-factor authentcation Manually creating an app password from the Office 365 portal 5]()


Changing your preferred device or multi-factor authentication option
Steps 1–4 will be the same as above. Your next steps will be as follows:
- Select the Update your phone numbers used for account security option.
![Changing your preferred device or multi-factor authentication option 1]()
- On the Additional security verification page, you can change your phone number as well as the default method of authentication. You can also configure the Authenticator app from this window.
![Changing your preferred device or multi-factor authentication option 2]()


Here’s the list of available options to choose from:

Configuring the Authenticator app
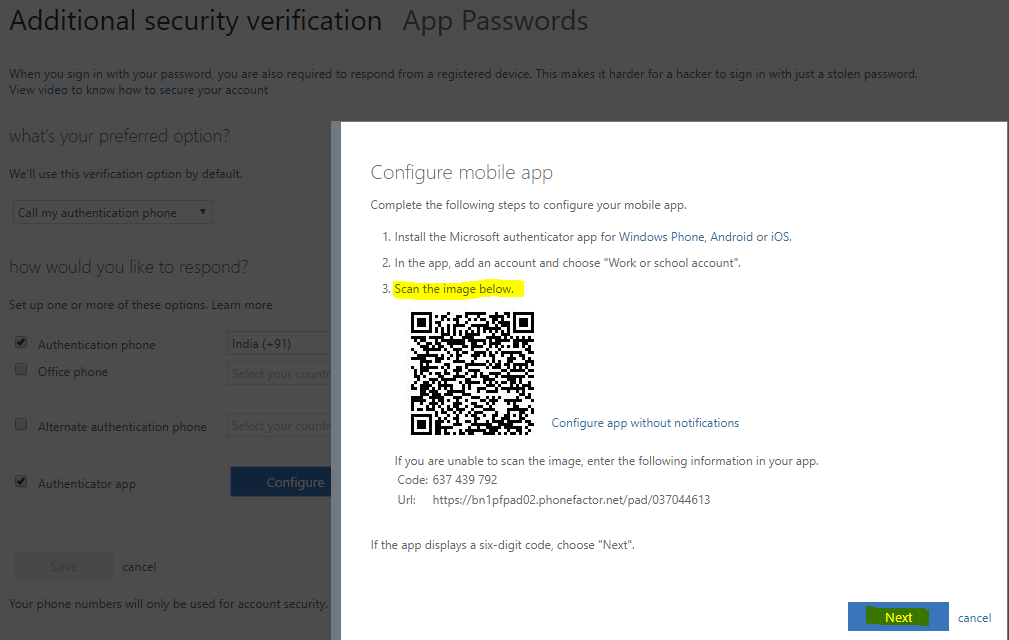
- On the Additional security verification page, check the box for Authenticator app and click Configure.
![Multi-factor authentication Configuring the Authenticator app 1]()
- Download the Microsoft Authenticator app on your smart phone. In the app, choose Add an account and select Work or School account. Then, scan the image provided on the current window (see below) with your smart phone. When you’re finished, click Next.
![Multi-factor authentication Configuring the Authenticator app 2]()
![Multi-factor authentication Configuring the Authenticator app 3]()
- Once the app is configured, click Save. That’s it! You’re all set to use the Authenticator app for push notifications or OTP.
![Multi-factor authentication Configuring the Authenticator app 4]()
![Multi-factor authentication Configuring the Authenticator app 5]()


Logging in with multi-factor authentication enabled
- The user will visit the Office 365 portal (https://portal.office.com), enter their email, and click Next.
![Logging in with multi-factor authentication enabled 1]()
- The user will enter their password and click Sign in.
![Logging in with multi-factor authentication enabled 2]()
- The user will be prompted to complete the second factor for authentication.
![Logging in with multi-factor authentication enabled 3]()
![Logging in with multi-factor authentication enabled 4]()
![Logging in with multi-factor authentication enabled 5]()
![Logging in with multi-factor authentication enabled 6]()
- After the user completes this step, they will be allowed to sign in to Office 365 or any of its services.
![Logging in with multi-factor authentication enabled 7]()


As you can see, multi-factor authentication is a simple but powerful way of protecting your user accounts in case their credentials are stolen. And setting it up is so easy that there’s no reason not to!
Download Our Free PowerPoint Deck!
7 Free Things You Can Do to Improve Your Office 365 Security Posture
Find out what you can be doing to better protect your Office 365 environment, why you should be taking these precautions and a step by step guide of how to implement these procedures.
The post Multi-Factor Authentication: Better Protect Your Office 365 Data appeared first on SherWeb.