The path an email takes from the Internet to a mailbox and vice versa is called mail flow. Most organizations want Office 365 to manage all their mailboxes as it has built-in malware and spam filtering capabilities that help to protect inbound and outbound messages from malicious software and spam. However, some organizations need mailboxes in Office 365 and remaining mailboxes in their on-premises Exchange environment, depending upon their business needs. An example of this is if you have a large number of students, faculty members and staff that you want email addresses for. Managing all of them using the on-premises Exchange server will require lots of resources. To save your resources, you can keep all students and faculty mailboxes in Office 365 and all staff mailboxes in on-premises Exchange Server. You can then set up connectors for mail flow between Office 365 and Exchange users.
Microsoft Office 365 allows you to define the best arrangement to set it up and organize how emails will be delivered to your mailboxes.
Most Organizations have their mailboxes in Exchange Online only without any on-premises Exchange environment, so you don’t need connectors. But if you have some mailboxes in Exchange Online and some mailboxes in on-premises Exchange environment or if you want Exchange Online Protection, then you will need to configure connectors in Office 365.
What Are Connectors And What Can They Do?
Connectors are a set of instructions that customize the way your email flows. It controls the flow of email to and from your Office 365 organization. Here’s why you need to set up connectors:
- Enable mail flow between Office 365 and your on-premises Exchange environment.
- Apply security restrictions, or controls, to mail exchanges with a business partner or service provider.
- Enable email notifications from a printer or other non-mailbox entity.
Here’s how to configure connectors to enable mail flow between Office 365 and your on-premises Exchange environment.
Why Do you Need to Set Up Connectors?
There are two scenarios for which you need to set up connectors to route emails between Office 365 and on-premises Exchange servers.
The first reason is if you have mailboxes in your on-premises Exchange servers and you want to subscribe to Exchange Online Protection (EOP) for email protection against spam filtering and malware protection.
The second reason is if you have some mailboxes in Office 365, and some of your mailboxes are on your on-premises Exchange servers and you want to enable mail flow between these two environments.
How does it Work with Your On-Premises Exchange Servers?
Office 365 connector works perfectly in both scenarios discussed above. In the first scenario you have no mailbox in Office 365; instead, you have just Exchange Online Protection subscription and on-premises Exchange Server. Therefore you need to set up connectors in Office 365 to enable mail flow from the Internet to your on-premises Exchange via Exchange Online Protection. By doing this your organization email will be protected against spam and malware. However, if some of your mailboxes are in Office 365 and some are on your on-premises Exchange servers, you need to set up connectors to enable mail flow in both directions. Below figure shows how Office 365 connector works with your on-premises Exchange Servers in both scenarios.
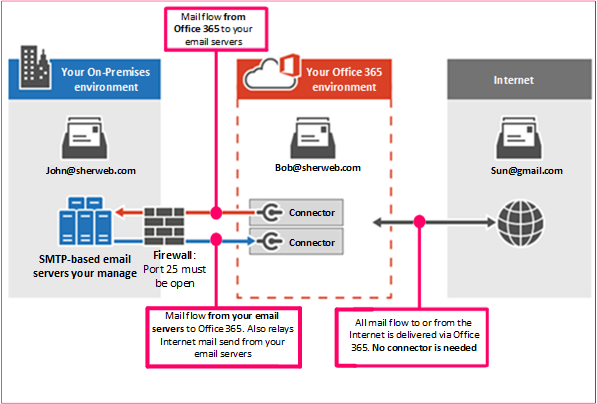
In this figure, John and Bob are both employees at a company named SherWeb. John has a mailbox in Exchange Server that you manage, and Bob has a mailbox that is located in Office 365. John and Bob both exchange emails with Sun, which is a customer of SherWeb having a Gmail account. Now:
- When an email is sent to John and Bob, connectors are needed.
- Similarly, when an email is sent to John and Sun, connectors are needed. All Internet email will be delivered via Office 365.
- And when an email is sent to Bob and Sun, no connector is needed.
So, if you have your on-premises Exchange Server environment and Office 365 subscription, you must set up connectors. Without connectors, you will not be able to send or receive emails.
How to Configure Connectors?
In order to route emails correctly, you will need to configure two connectors in Office 365. One connector must route emails from Office to your on-premises Exchange Server and a second connector must route emails from on-premises Exchange Server to Office 365. Let’s further discuss these two connectors and how they route emails.
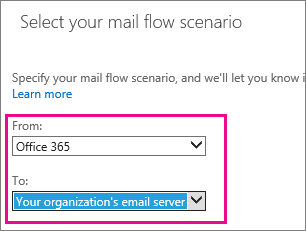
1) Office 365 to On-Premises Exchange Server
After Office 365 subscription and configuration, you need to set up Office 365 to accept all emails on behalf of your organization. For this purpose, you will need to configure connectors and then point your domain’s MX (mail exchanger) record to Office 365. To prepare for this scenario, you must create a send connector in the form of smart hosts in your on-premises Exchange environment. Due to this connector, a mailbox in Office 365 can send emails to a mailbox in your on-premises Exchange server. You might also need to configure your Exchange server to accept messages delivered by Office 365.
In order to create a connector in Office 365, click Admin, and then click Exchange to go to the Exchange admin center. Next, click mail flow, and click connectors. Click Add, and follow the instructions in the wizard to create a connector from Office 365 to your on-premises Exchange servers.
2) From On-Premises Exchange Servers to Office 365
With the help of this connector, Office 365 will accept all messages from your organization’s email servers and send the messages on your behalf to recipients in Office 365 as well as to external recipients like Gmail. Now, in order to complete this scenario, you will further need to configure your Exchange servers to send email messages directly to Office 365. Now here this connector will enable Office 365 to scan your email for spam and malware protection. On your on-premises Exchange server, you will need to configure a Send connector to send emails via a smart host to Office 365.
For example, to create a new Send connector in your on-premises Exchange server, you will need to enter the following information:
Name: SherWeb to Office 365
FQDN: mail.sherweb.com
SmartHosts: sherweb-com.mail.protection.outlook.com
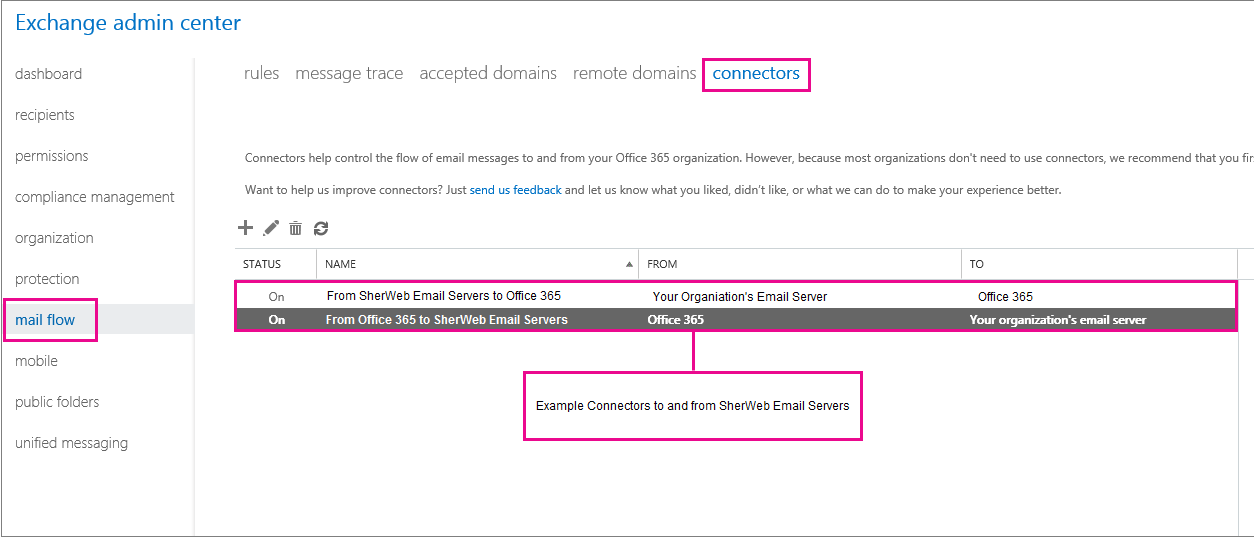
In order to create a connector in Office 365 portal, click Admin, then click Exchange, and then go to the Exchange admin center. Next, click mail flow, and then click connectors. Click Add, and follow the instructions in the wizard to create a connector from your on-premises Exchange servers to Office 365.

After completing the Wizards in both connectors, you will find two connectors created in Office 365 connectors as below.
There are two reasons why you need to set up Office 365 connectors. The first reason is if you have a standalone Exchange Online Protection (EOP) subscription scenario, which means you have your own email servers (also called on-premises servers) and you subscribe to EOP only for email protection services against spam filtering and malware protection. The second reason is if you have some mailboxes in the Office 365 environment and some mailboxes in the On-premises Exchange Server environment and you want to enable mail flow between these two environments. Before you set up connectors for these two scenarios, you must make sure whether you only need connectors or if an Exchange hybrid deployment better meets your business needs.
Need more help setting up Office 365? Let us know in the comments bellow what we should cover next!

The post Setting Up Office 365 Connector for Mail Flow appeared first on SherWeb.